
Difference between revisions of "W5020 CS Ed Week 2020"
SheLikesPigs (talk | contribs) m (→CSS) |
SheLikesPigs (talk | contribs) m (→CSS) |
||
| Line 611: | Line 611: | ||
2 Now lets change the color of our text, add the highlighted lines to your code: | 2 Now lets change the color of our text, add the highlighted lines to your code: | ||
<syntaxhighlight lang=" | <syntaxhighlight lang="css" highlight="5-7"> | ||
body { | body { | ||
background-color: lightblue; | background-color: lightblue; | ||
| Line 625: | Line 625: | ||
3. Now lets center the h1 and make it bigger, add the highlighted lines to your code: | 3. Now lets center the h1 and make it bigger, add the highlighted lines to your code: | ||
<syntaxhighlight lang=" | <syntaxhighlight lang="css" highlight="6-7"> | ||
body { | body { | ||
background-color:lightblue; | background-color:lightblue; | ||
| Line 640: | Line 640: | ||
3. Finally for our h1, lets make a background color and frame around, add the highlighted lines to your code: | 3. Finally for our h1, lets make a background color and frame around, add the highlighted lines to your code: | ||
<syntaxhighlight lang=" | <syntaxhighlight lang="css" highlight="8-9"> | ||
body { | body { | ||
background-color:lightblue; | background-color:lightblue; | ||
| Line 657: | Line 657: | ||
4. Next, lets add some color to our h2, add the highlighted lines to your code: | 4. Next, lets add some color to our h2, add the highlighted lines to your code: | ||
<syntaxhighlight lang=" | <syntaxhighlight lang="css" highlight="11-13"> | ||
body { | body { | ||
background-color:lightblue; | background-color:lightblue; | ||
| Line 677: | Line 677: | ||
5. Our image looks a little big , add the highlighted lines to your code: | 5. Our image looks a little big , add the highlighted lines to your code: | ||
<syntaxhighlight lang=" | <syntaxhighlight lang="css" highlight="14-17"> | ||
body { | body { | ||
background-color:lightblue; | background-color:lightblue; | ||
| Line 701: | Line 701: | ||
6. Now lets edit the paragraphs, add the highlighted lines to your code: | 6. Now lets edit the paragraphs, add the highlighted lines to your code: | ||
<syntaxhighlight lang=" | <syntaxhighlight lang="css" highlight="18-20"> | ||
body { | body { | ||
background-color:lightblue; | background-color:lightblue; | ||
Revision as of 18:53, 6 December 2020
Preface[edit]
If you would like to participate in the event, please sign up using the following link: https://docs.google.com/forms/d/e/1FAIpQLSfFQMQGN6zUe9Gsr0JuKRKjwXEtn6TYopP3f01Iq6zAOtuZuw/viewform?usp=sf_link
Future updates will be provided through the Remind class @ahs-csed.
We thank you for your interest in participating!
Promotional Material[edit]
An Hour of Code and Beyond
==There's more to it than meets the eye==
Wednesday, December 9th, 2020 5PM-7PM
What is CS ED Week about: “Computer Science Education Week (CSEdWeek) is an annual call to action to inspire K-12 students to learn computer science, advocate for equity in computer science education, and celebrate the contributions of students, teachers, and partners to the field. As part of the #CSforGood movement this year we’re proud to elevate”
Topics we will go over:
 * Computer science Intro
 * Linux Basics
 * Shell basics
 * Igis and graphics
 * CSS/HTML Basics
Merlin Shell Access Application:
If you do not have access to the Merlin Shell, use this Link to sign up. You will need this access to the shell in order to participate in the events today!

https://www.codermerlin.com/wiki/index.php/Merlin_Shell_Access_Application
CS ED Survey If you already completed the application above, fill this survey so we can see what interests you!
https://docs.google.com/forms/d/e/1FAIpQLScyx0dsKmb53X6WCXeMNaISDzvVfIpH6u-pvJluvF_ZEke9Ew/viewform?embedded=true
Computer Science[edit]
Why Computer Science?[edit]
Computer science is one of the fastest growing pathways in terms of not only economic viability, but also accessibility and significance. With the onset of the digital age, many industries have turned towards technology as their ticket to the future, and now, more than ever, need computer scientists in their fields: restaurants and grocery chains rely on mobile applications for deliveries and purchases, while distributors like Amazon continue to thrive in online shopping. Yet without the programmers behind the scenes, none of this would be possible.
Programming exists virtually everywhere, encompassing a large share of the job market, and can be done in any environment.
Fundamental Concepts of Computer Science[edit]
Computer Science, at its core, is an expression of variable representation and operation through numerical evaluation. In more simple terms, everything can be done by building up on numbers. Computers use binary, a series of 1’s and 0’s, to understand values. A different pattern means a different number, such as 0010 representing 2 and 1011 being 11. Coding languages are the bridge between computers and humans, allowing us to “talk” to machines and tell them what to do. Coding languages have a few basic concepts used to store real world values:
- Booleans represent whether something is true or false
- Integers represent positive and negative whole numbers
- Doubles represent positive and negative decimals
- Characters represent ‘letters’, except they also include numbers, symbols, and other written characters, so long as they are only 1 unit long. This means ‘a’ is a character while ‘an’ is two characters.
- Strings represent words, or several characters put together
These are the 5 basic variable types used in coding. However, if you wanted to store the information of something more complicated, like a car, you would use classes. A class is a way to group together lots of smaller variables under a single object. For example, every car must have engine specs, a color, some number of seats, and other information which can be stored using any of the 5 basic data types. A class allows you to put everything together under one name. Classes also have the ability to do things, called functions. Functions are the actions a class can do, such as a car class having the ability to change its color through a paintjob or increase its speed.
Linux Basics[edit]
Getting Ready[edit]
Installing the secure shell extension[edit]
To access Merlin, you'll need a secure shell client.
If you're using a Windows-based device (usable on any device with Chrome): install Google Chrome, open up Chrome and search "Secure Shell Extension", install the extension.

If you're using a Mac or Linux based device, it probably has a built-in client which can be accessed from the terminal.

You will need a connection string to access the server.
Obtaining an account[edit]
Fill out this form (if you haven't already) and wait for your credentials to be provided (via email).
Once your account is obtained, open up the "Connection Dialogue", and input the connection string. It will prompt you for your password, input it and continue.
It will prompt you to reset your password, which you can do by typing "passwd" into the terminal:
 Helpful Hint
(here for further information)
Change your default password to a strong password:
john-williams@codermerlin:~$ passwd
Changing password for john-williams.
(current) UNIX password:
Enter new UNIX password:
Retype new UNIX password:
passwd: password updated successfully
[edit]
In order to see what our working directory is inside the shell, we are going to use pwd which stands for "print the working directory". You can use the command by typing it in and hitting <RETURN>.
first-last@codermerlin:~$ pwd
/home/first-last
After using the command you should see something like the above console line. As long as you haven't moved in the directory you should start off in the home directory.
Next, let's try the ls command which will list the directories and files in the working directory. However no files or directories have been created yet, so there won't be anything to display.
first-last@codermerlin:~$ ls
We can make a directory by using the command mkdir
first-last@codermerlin:~$ mkdir firstDirectory
Then to enter the directory simply use the command "cd <SPACE> directoryName".
first-last@codermerlin:~$ cd firstDirectory
And if we use the pwd command now, we should see that we are in the created directory.
first-last@codermerlin:~$ pwd
/home/first-last/firstDirectory
Now let's navigate out of the current directory. Using the previous cd command we can use "../" to go back one directory (which can be chained together, e.g. "../../../"), leave it blank to return to the home directory or use "~" to also get to the home directory.
first-last@codermerlin:~$ cd ../
Now that we have returned to the home directory, let's try listing again:
first-last@codermerlin:~$ ls
You should now see the directory previously added.
firstDirectory
We can create a file using the emacs command followed by the file name and extension. In this case, we are using the Swift coding language so the extension is ".swift". This will create and open the file, which will initially be blank, but if the file already exists this command can be used to open and edit it.
first-last@codermerlin:~$ emacs main.swift
Once we have a file open we can begin using emacs short-cuts in order to navigate and edit the file. However for now let's suspend the file using CONTROL-z (press your control key, followed by the 'z' key).
Now we are back in the shell, however, we still have a file that is open, but suspended. Using the command jobs we can see all of our open files.
first-last@codermerlin:~$ jobs
Upon using the command you should see something similar to this:
first-last@codermerlin:~$ [1]+ Stopped /usr/local/bin/emacs main.swift
Let's reopen the file using the fg command.
first-last@codermerlin:~$ fg
And finally, let's first save the file using CONTROL-x-s and then close the file using CONTROL-x-c. For further reference of the Emacs commands, continue to the next section.
For more detailed information on this and relating topics: W1002 The Client, the Server, and the Shell
Emacs[edit]
Emacs is the text editor we will be using to edit our files today. Many of the important key sequences for navigating, suspending/exiting, and saving files will be displayed in the following charts. Keep in mind this list is not comprehensive, but mostly accounts for basic emacs usage. A comprehensive list of Emacs Keys can be found here. Additionally typing "emacs" into the shell brings up further documentation.
[edit]
| Key Sequence | Purpose |
|---|---|
| CONTROL-v | Scroll down (forwards) one page |
| ALT-v | Scroll up (backwards) one page |
| CONTROL-l (second character is lowercase 'L') | Clear screen and redisplay the text, moving the cursor to the vertical center |
| ALT-SHIFT-< | Move the cursor to the beginning of the file |
| ALT-SHIFT-> | Move the cursor to the end of the file |
The arrow keys can be used to traverse across characters. Keep in mind that emacs keys for moving across characters are options as well.
Suspend/Exit and Save[edit]
| Key Sequence | Purpose |
|---|---|
| CONTROL-x CONTROL-c | Exit emacs |
| CONTROL-z | Suspend emacs temporarily |
| CONTROL-x CONTROL-s | Save the current file |
| CONTROL-x s | Save changed files (prompts for all confirmation) |
Graphics Project[edit]

For our project we'll be recreating a 2D, table-tennis themed Atari videogame "Pong" using the Igis and Scenes libraries provided as part of the open-source Merlin suite.
Getting Started[edit]
Before we begin, let's create a Projects directory to keep all of our projects organized:
first-last@codermerlin:~$ mkdir Projects
first-last@codermerlin:~$ cd Projects/
To start, we'll need to import a prepared template of the game using GitHub. Type the following into the console:
first-last@codermerlin:~/Projects$ git clone https://github.com/Riley229/IgisGraphics-Pong Pong/
This copies files from a GitHub repository to your shell for you to edit. In this case they're copied into the directory Pong/.
Enter the newly created Pong directory:
first-last@codermerlin:~/Projects$ cd Pong/
Now, let's view all the files in our projects directory.
first-last@codermerlin:~/Projects/Pong$ tree
You should see several files along with a Directory named Sources/ containing another directory named ScenesShell/. The files we want to edit are in the ScenesShell/ directory, so let's navigate there:
first-last@codermerlin:~/Projects/Pong$ cd Sources/ScenesShell
Before we edit anything, let's see what this code does.
| Run the program.
first-last@codermerlin:~/Projects/Pong/Sources/ScenesShell$ run |
Open a browser (or use a new tab on an already-open browser). Then, go to the URL:
http://igis.codermerlin.com/users/user-name
NOTE: You MUST change user-name to your actual user name. For example, http://igis.codermerlin.com/users/ty-cam
First Steps[edit]
| Stop the running program.
Return to the console and press CONTROL-C |
We'll start by making a working ball. Navigate to the Interaction/ directory and edit the file Ball.swift.
first-last@codermerlin:~/Projects/Pong/Sources/ScenesShell$ cd Interaction/
first-last@codermerlin:~/Projects/Pong/Sources/ScenesShell/Interaction$ emacs Ball.swift
You'll find some code as follows:
class Ball : RenderableEntity
This defines a new class named Ball. The colon and the following identifier, RenderableEntity, indicates that the class Ball inherits properties and methods from the class RenderableEntity. You'll note that the class includes a constructor, indicated by the keyword init:
init() {
    // Initialize objects
    velocityX = 0
    velocityY = 0

    // Using a meaningful name can be helpful for debugging
    super.init(name:"Ball")
}
The constructor is invoked automatically as the object (an instance of the class) is being initialized. This is the place where you'll set up your object. The current constructor in this file sets the object's name using the keywords super and init. super indicates that we're invoking a function (or accessing a property) on our parent class, the class from which we inherited. In this case, that would be the RenderableEntity.
We're going to display a ball on our canvas (the virtual surface on which we'll be rendering images in the browser). In order to do that, we'll first declare an Ellipse object as follows:
class Ball : RenderableEntity {
    let ellipse : Ellipse

    var velocityX : Int
    var velocityY : Int

    // ...
}
We'll initialize our ellipse object in the constructor:
init() {
    // Initialize objects
    ellipse = Ellipse(center:Point(x:100, y:100), radiusX:20, radiusY:20, fillMode:.fill)
    velocityX = 0
    velocityY = 0

    // Using a meaningful name can be helpful for debugging
    super.init(name:"Background")
}
At this point, we have an Ellipse object that "knows" how to render itself on the canvas, but it hasn't yet actually done any rendering. The method we use to render objects onto the canvas is render which executes once per frame.
Add a new method (below init) as follows:
override func render(canvas:Canvas) {
    canvas.render(ellipse)
}
This code instructs the ellipse object to render itself on the canvas.
Be sure to edit the file as indicated above, save the file, then suspend emacs.
| Run the program and refresh the browser page. |
Styling[edit]
| Stop the running program. |
Let's change the styling. Resume emacs and add a new FillStyle object and initialize it:
class Ball : RenderableEntity {
    let fillStyle : FillStyle
    let ellipse : Ellipse

    var velocityX : Int
    var velocityY : Int

    init() {
        // Initialize objects
        fillStyle = FillStyle(color:Color(.white))
        ellipse = Ellipse(center:Point(x:100, y:100), radiusX:20, radiusY:20, fillMode:.fill)
        velocityX = 0
        velocityY = 0

        // Using a meaningful name can be helpful for debugging
        super.init(name:"Background")
    }
}
Then, render it directly onto the canvas.
func render(canvas:Canvas) {
    // render the fillstyle modifier before the ellipse object
    canvas.render(fillStyle, ellipse)
}
Remember to save the file, then suspend emacs.
| Run the program and refresh the browser page. |
Positioning[edit]
At the start of our game, we want the ball to appear in the center of the canvas. To do this, let's first add a boolean flag which will determine if we've set the initial coordinates:
class Ball : RenderableEntity {
    let fillStyle : FillStyle
    let ellipse : Ellipse

    var velocityX : Int
    var velocityY : Int
    var coordinatesSet = false

    // ...
Now to set the ellipses position, we will use the calculate method which is called every frame before the render method:
override func calculate(canvasSize:Size) {
    if !coordinatesSet {
        ellipse.center = canvasSize.center
        coordinatesSet = true
    }
}
We are unable to set the coordinates of the ball before this since we don't know the size of the canvas prior to the invocation of this method.
| Run the program and refresh the browser page. |
Animating[edit]
Let's teach our ball to move on it's own, given a velocity. In your Ball.init() constructor, change both the velocityX and velocityY values to somewhere in the range of 8-16.
We now need to add some "brains" to our ball so that it "knows" how to move based on it's velocity. Edit your calculate method as follows:
func calculate(canvasSize:Size) {
    if !coordinatesSet {
        ellipse.center = canvasSize.center
        coordinatesSet = true
    } else {
        ellipse.center += Point(x:velocityX, y:velocityY)
    }
}
| Run the program and refresh the browser page. |
Hit Testing[edit]
The process of determining whether an on-screen, graphical object, such as a ball, intersects with another on-screen, graphical object is termed hit-testing. We'll use hit-testing to determine if our ball intersects with the edge of the canvas. A straight-forward (yet sometimes inaccurate) method to perform hit-testing involves drawing an imaginary rectangle around objects of interest and then checking to see whether or not this minimum bounding rectangle overlaps the bounding rectangle of any other objects of interest.
First, let's implement a new method which returns an accurate bounding rect for our ball object:
override func boundingRect() -> Rect {
    return ellipse.boundingRect()
}
Now, update the Ball.calculate(canvasSize:) method as follows:
func calculate(canvasSize:Size) {
    if !coordinatesSet {
        ellipse.center = canvasSize.center
        coordinatesSet = true
    } else {
        // First, move to the new position
        ellipse.center += Point(x:velocityX, y:velocityY)

        // Form a bounding rectangle around the canvas
        let canvasBoundingRect = Rect(size:canvasSize)

        // Form a bounding rect around the ball (ellipse)
        let ballBoundingRect = boundingRect()

        // Perform a hit test of the ball with the canvas bounding rect.
        let hitTest = canvasBoundingRect.containment(target:ballBoundingRect)

        // If we're too far to the top or bottom, we bounce the y velocity
        if hitTest.tooFarTop || hitTest.tooFarBottom {
            velocityY = -velocityY
        }

        // If we're too far to the left or right, we bounce the x velocity
        if hitTest.tooFarLeft || hitTest.tooFarRight {
            velocityX = -velocityX
        }
    }
}
| Run the program and refresh the browser page. |
Game Rules[edit]
In the game of pong, the goal is to prevent the ball from coming into contact with your edge of the screen. As such, we need to alter our code to handle hits on the left and right side of the screen.
func calculate(canvasSize:Size) {
    guard let mainScene = scene as? MainScene else {
        fatalError("Ball expected owning scene to be type MainScene.")
    }

    if !coordinatesSet {
        // ...
    } else {
        // ...

        // If we're too far to the left or right, we need to reset the ball and tell the scene which player has scored
        if hitTest.contains(.overlapsLeft) {
            coordinatesSet = false
            mainScene.addPoint(to:.right)
        } else if hitTest.contains(.overlapsRight) {
            coordinatesSet = false
            mainScene.addPoint(to:.left)
        }
    }
}
| Run the program and refresh the browser page. |
Adding Paddles[edit]
Now that we have a (almost) fully functioning ball, lets add the paddles. enter emacs and navigate to the file InteractionLayer.swift. You should notice the following RenderableEntities defined at the top of the class:
let ball = Ball()
let leftPaddle = Paddle(position:.left)
let rightPaddle = Paddle(position:.right)
Although these entities are already created, they are not yet recieving frame updates. To register an entity to recieve frame updates, we use the insert(entity: at:) function. Navigate to the initialization and add the following lines:
init() {
    // Using a meaningful name can be helpful for debugging
    super.init(name:"Interaction")

    // We insert our RenderableEntities in the constructor
    insert(entity:ball, at:.front)
    insert(entity:leftPaddle, at:.front)
    insert(entity:rightPaddle, at:.front)
}
| Run the program and refresh the browser page. |
Note: when you run the program, use the "w" and "s" keys to maneuver the left paddle, and the "ArrowUp" and "ArrowDown" keys to maneuver the right paddle.
You may notice that the paddles aren't interacting with the ball. To correct this, change the enableHitTesting variable at the top of the file to true.
Your Turn[edit]
To take this project one step further, try implementing some of the following features:
- In the Paddle.swift file, try changing the keybindings to move the paddles up and down.
- Add a short delay between rounds after the ball resets to the center of the canvas and before it resumes moving.
- Implement a power bounce such that immediately after a collision with the canvas edge the ball accelerates to twice its original velocity then slows back to that original velocity.
Web Design[edit]
What is Web design?
Web design is the design of web pages through the use of HTML, CSS, and Java Script. Today, we will be using HTML and CSS to create our one websites about social justice.
- HTML: Hypertext Markup Language (HTML) is the standard markup language for documents designed to be displayed in a web browser.
- CSS: Cascading Style Sheets is a style sheet language used for describing the presentation of a document written in a markup language such as HTML.
Today we will be using Repl.it to design out own website.
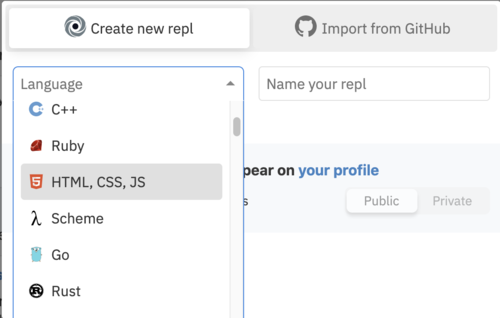
1. Click on the link below and create an account using the your student emails:
https://repl.it/
2. Once logged in, click on "new repl"and "HTML, CSS, JS" and create the repl
]


HTML[edit]
Now you should have the basic HTML Code that looks like this:
<html>
  <head>
    <meta charset="utf-8">
    <meta name="viewport" content="width=device-width">
    <title>repl.it</title>
    <link href="style.css" rel="stylesheet" type="text/css" />
  </head>
  <body>
    <script src="script.js"></script>
  </body>
</html>
Let's start creating our website. Add the highlighted lines to your code.
<html>
  <head>
    <meta charset="utf-8" >
    <meta name="viewport" content="width=device-width">
    <title>repl.it</title>
    <link href="style.css" rel="stylesheet" type="text/css" />
  </head>
  <body>
    <script src="script.js"></script>

    <h1> This is a header</h1>
    <h2>This is a smaller header</h2>
  </body>
</html>
| Now, "Run" your code by pressing the green button at the top. What do you notice? |
What you just added is called the header. The Header has an "h1" tag, and allows you create the title of your website. At the end, you must add the closing tag, "/h1." If you want a smaller header, replace "1" with any other larger number to create sub-headers.
Let's add a little more to our website, like some sentences. Add the highlighted lines to your code.
<html>
  <head>
    <meta charset="utf-8" >
    <meta name="viewport" content="width=device-width">
    <title>repl.it</title>
    <link href="style.css" rel="stylesheet" type="text/css" />
  </head>
  <body>
    <script src="script.js"></script>
    <h1>This is a header</h1>
    <h2>This is a smaller header</h2>
    <p>This is a paragraph tag</p>
    <p>You can use this tag as many times to create short sentences or long paragraphs based on the theme of your website</p>
  </body>
</html>
| Now, "Run" your code by pressing the green button at the top. What do you notice? |
What you just added is the paragraph tag. The "p" tag allows you to create sentences.
Finally, lets add some pictures to our code...
<html>
  <head>
    <meta charset="utf-8" >
    <meta name="viewport" content="width=device-width">
    <title>repl.it</title>
    <link href="style.css" rel="stylesheet" type="text/css" />
  </head>
  <body>
    <script src="script.js"></script>
    <h1>This is a header</h1>
    <h2>This is a smaller header</h2>
    <p>This is a paragraph tag</p>
    <p>You can use this tag as many times to create short sentences or long paragraphs based on the theme of your website</p>
    <img src ="https://journocode.com/wp-content/uploads/2016/06/htmlCssJS-1140x515.jpg">
  </body>
</html>
| Now, "Run" your code by pressing the green button at the top. What do you notice? |
You have created an image! This tag allows you to add your own images. Just make sure to copy the image link, and make sure that the link is not too long, or else your program may crash!
CSS[edit]
While our website looks great with simple text and images, let's make it more colorful and exciting by using CSS!
On the left side of your repl.it page, there should be all your files for working with HTML,CSS, and JavaScript, click style.css to work in CSS

1. First let's change the color of the background with CSS, add the highlighted lines to your code:
body {
  background-color: lightblue;
}
| Now, "Run" your code by pressing the green button at the top. What do you notice? |
Helpful Hint
2 Now lets change the color of our text, add the highlighted lines to your code:
body {
  background-color: lightblue;
}

h1 {
  color: mediumaquamarine;
}
| Now, "Run" your code by pressing the green button at the top. What do you notice? Is there a different between using background-color and color? |
3. Now lets center the h1 and make it bigger, add the highlighted lines to your code:
body {
  background-color:lightblue;
}
h1 {
  color:mediumaquamarine;
  text-align: center;
  font-size: 50px;
}
| Now, "Run" your code by pressing the green button at the top. What do you notice? Try changing the number before px, what does this do? |
3. Finally for our h1, lets make a background color and frame around, add the highlighted lines to your code:
body {
  background-color:lightblue;
}
h1 {
  color:mediumaquamarine;
  text-align: center;
  font-size: 50px;
  background-color: aquamarine;
  border: solid palegreen 10px;
}
| Now, "Run" your code by pressing the green button at the top. What do you notice? Try changing the number before px, what does this do? |
4. Next, lets add some color to our h2, add the highlighted lines to your code:
body {
  background-color:lightblue;
}
h1 {
  color:mediumaquamarine;
  text-align: center;
  font-size: 50px;
  background-color: aquamarine;
  border: solid palegreen 10px;
}
h2 {
  color:pink;
}
| Now, "Run" your code by pressing the green button at the top. |
5. Our image looks a little big , add the highlighted lines to your code:
body {
  background-color:lightblue;
}
h1 {
  color:mediumaquamarine;
  text-align: center;
  font-size: 50px;
  background-color: aquamarine;
  border: solid palegreen 10px;
}
h2 {
  color:pink;
}
img {
  width: 650px;
  height: 300px;
}
| Now, "Run" your code by pressing the green button at the top. What happens if you take out the width line? The height line? |
6. Now lets edit the paragraphs, add the highlighted lines to your code:
body {
  background-color:lightblue;
}
h1 {
  color:mediumaquamarine;
  text-align: center;
  font-size: 50px;
  background-color: aquamarine;
  border: solid palegreen 10px;
}
h2 {
  color:pink;
}
img {
  width: 650px;
  height: 300px;
}
p{
  color:white;
}
| Now, "Run" your code by pressing the green button at the top. Why do you think both of the paragraph lines changed colors? |
Classes[edit]
In the previous edit to our CSS code, changed both the paragraphs, but what happens if we want to change only one paragraph? Or what happens if we have multiple images and we only want to change the size of one? This is where classes come in. Classes allow you to add another "name" to a certain element in HTML, and you can access that "name" in CSS to change that element.
Let's go back to our HTML file, this is what it should look like:
<html>
  <head>
    <meta charset="utf-8" >
    <meta name="viewport" content="width=device-width">
    <title>repl.it</title>
    <link href="style.css" rel="stylesheet" type="text/css" />
  </head>
  <body>
    <script src="script.js"></script>
    <h1>This is a header</h1>
    <h2>This is a smaller header</h2>
    <p>This is a paragraph tag</p>
    <p>You can use this tag as many times to create short sentences or long paragraphs based on the theme of your website</p>
    <img src ="https://journocode.com/wp-content/uploads/2016/06/htmlCssJS-1140x515.jpg">
  </body>
</html>
In order to make a class, in the start tag of an HTML line, you add " Class = "class-name" ", the text between the quotes (in this case, class-name) can be changed to whatever you want to call it. Lets look at an example, edit the highlighted line in your code:
<html>
  <head>
    <meta charset="utf-8" >
    <meta name="viewport" content="width=device-width">
    <title>repl.it</title>
    <link href="style.css" rel="stylesheet" type="text/css" />
  </head>
  <body>
    <script src="script.js"></script>
    <h1>This is a header</h1>
    <h2>This is a smaller header</h2>
    <p class = "first-paragraph">This is a paragraph tag</p>
    <p>You can use this tag as many times to create short sentences or long paragraphs based on the theme of your website</p>
    <img src ="https://journocode.com/wp-content/uploads/2016/06/htmlCssJS-1140x515.jpg">
  </body>
</html>
Your Turn[edit]
Now its your turn! using all of the tools you have just learned with Web Design, create your own website about social justice! Make sure you add pictures, and make your website visually pleasing with CSS!