W5020.10 Graphics
Computer Graphics[edit]
First of all, what is computer graphics?
Computer graphics is the branch of computer science that deals with generating images with the aid of computers. Today we will be using Swift to create a working version of "Pong"
- Swift: Swift is a general-purpose programming language developed by Apple Inc for use with their macOS, iOS, iPadOS, and tvOS operating systems.
Today we will use the Igis and Scenes graphic libraries to assist in creating our game.
Setup[edit]
1. Setup a Projects directory in the Merlin Shell to keep all of our projects organized:
first-last@codermerlin:~$ mkdir Projects
first-last@codermerlin:~$ cd Projects/
2. Import the prepared template by typing the following into the console:
first-last@codermerlin:~/Projects$ git clone https://github.com/Riley229/IgisGraphics-Pong Pong/
This copies files from a GitHub repository into the directory Pong/ for you to edit.
NOTE: To paste external data from your clipboard into emacs, right click with your mouse.
Getting Started[edit]
Enter the newly created Pong directory and view all the files:
first-last@codermerlin:~/Projects$ cd Pong/
first-last@codermerlin:~/Projects/Pong$ tree
You should see several files along with a Directory named Sources/ containing another directory named ScenesShell/. The files we want to edit are in the ScenesShell/ directory, so navigate there:
first-last@codermerlin:~/Projects/Pong$ cd Sources/ScenesShell
Before we edit anything, let's see what this code does.
 |
Run the program.
first-last@codermerlin:~/Projects/Pong/Sources/ScenesShell$ run |
Open a browser (or use a new tab on an already-open browser). Then, go to the URL:
http://www.codermerlin.com/igis/user-name/index.html
NOTE: You MUST change user-name to your actual user name. For example, http://www.codermerlin.com/igis/ty-cam/index.html
| Stop the running program.
Return to the console and press CONTROL-C |
We'll start by making a working ball. Navigate to the Interaction/ directory and edit the file Ball.swift.
first-last@codermerlin:~/Projects/Pong/Sources/ScenesShell$ cd Interaction/
first-last@codermerlin:~/Projects/Pong/Sources/ScenesShell/Interaction$ emacs Ball.swift
If you are prompted to do so, press "i" to finish importing the project.
You'll find some code as follows:
class Ball : RenderableEntity
This defines a new class named Ball. The colon and the following identifier, RenderableEntity, indicates that the class Ball inherits properties and methods from the class RenderableEntity. You'll note that the class includes a constructor, indicated by the keyword init:
init() {
    // Initialize objects
    velocityX = 0
    velocityY = 0

    // Using a meaningful name can be helpful for debugging
    super.init(name:"Ball")
}
The constructor is invoked automatically as the object (an instance of the class) is being initialized. This is the place where you'll set up your object. The current constructor in this file sets the object's name using the keywords super and init. super indicates that we're invoking a function (or accessing a property) on our parent class, the class from which we inherited. In this case, that would be the RenderableEntity.
We're going to display a ball on our canvas (the virtual surface on which we'll be rendering images in the browser). In order to do that, we'll first declare an Ellipse object as follows:
class Ball : RenderableEntity {
    let ellipse : Ellipse

    var velocityX : Int
    var velocityY : Int

    // ...
}
We'll initialize our ellipse object in the constructor:
init() {
    // Initialize objects
    ellipse = Ellipse(center:Point(x:100, y:100), radiusX:20, radiusY:20, fillMode:.fill)
    velocityX = 0
    velocityY = 0

    // Using a meaningful name can be helpful for debugging
    super.init(name:"Ball")
}
At this point, we have an Ellipse object that "knows" how to render itself on the canvas, but it hasn't yet actually done any rendering. The method we use to render objects onto the canvas is render which executes once per frame.
Add a new method (below init) as follows:
override func render(canvas:Canvas) {
    canvas.render(ellipse)
}
This code instructs the ellipse object to render itself on the canvas.
Be sure to edit the file as indicated above, save the file, then suspend emacs.
 |
Run the program and refresh the browser page. |
Styling[edit]
| Stop the running program. |
Let's change the styling. Resume emacs and add a new FillStyle object and initialize it:
class Ball : RenderableEntity {
    let fillStyle : FillStyle
    let ellipse : Ellipse

    var velocityX : Int
    var velocityY : Int

    init() {
        // Initialize objects
        fillStyle = FillStyle(color:Color(.white))
        ellipse = Ellipse(center:Point(x:100, y:100), radiusX:20, radiusY:20, fillMode:.fill)
        velocityX = 0
        velocityY = 0

        // Using a meaningful name can be helpful for debugging
        super.init(name:"Background")
    }
}
Then, render it directly onto the canvas.
func render(canvas:Canvas) {
    // render the fillstyle modifier before the ellipse object
    canvas.render(fillStyle, ellipse)
}
Remember to save the file, then suspend emacs.
 |
Run the program and refresh the browser page. |
Positioning[edit]
At the start of our game, we want the ball to appear in the center of the canvas. To do this, let's first add a boolean flag which will determine if we've set the initial coordinates:
class Ball : RenderableEntity {
    let fillStyle : FillStyle
    let ellipse : Ellipse

    var velocityX : Int
    var velocityY : Int
    var coordinatesSet = false

    // ...
Now to set the ellipses position, we will use the calculate method which is called every frame before the render method:
override func calculate(canvasSize:Size) {
    if !coordinatesSet {
        ellipse.center = canvasSize.center
        coordinatesSet = true
    }
}
We are unable to set the coordinates of the ball before this since we don't know the size of the canvas prior to the invocation of this method.
 |
Run the program and refresh the browser page. |
Animations[edit]
Let's teach our ball to move on it's own, given a velocity. In your Ball.init() constructor, change both the velocityX and velocityY values to somewhere in the range of 8-16.
We now need to add some "brains" to our ball so that it "knows" how to move based on it's velocity. Edit your calculate method as follows:
func calculate(canvasSize:Size) {
    if !coordinatesSet {
        ellipse.center = canvasSize.center
        coordinatesSet = true
    } else {
        ellipse.center += Point(x:velocityX, y:velocityY)
    }
}
 |
Run the program and refresh the browser page. |
Hit Testing[edit]
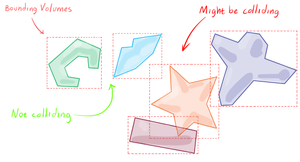
The process of determining whether an on-screen, graphical object, such as a ball, intersects with another on-screen, graphical object is termed hit-testing. We'll use hit-testing to determine if our ball intersects with the edge of the canvas. A straight-forward (yet sometimes inaccurate) method to perform hit-testing involves drawing an imaginary rectangle around objects of interest and then checking to see whether or not this minimum bounding rectangle overlaps the bounding rectangle of any other objects of interest.
First, let's implement a new method which returns an accurate bounding rect for our ball object:
override func boundingRect() -> Rect {
    return ellipse.boundingRect()
}
Now, update the Ball.calculate(canvasSize:) method as follows:
func calculate(canvasSize:Size) {
    if !coordinatesSet {
        ellipse.center = canvasSize.center
        coordinatesSet = true
    } else {
        // First, move to the new position
        ellipse.center += Point(x:velocityX, y:velocityY)

        // Form a bounding rectangle around the canvas
        let canvasBoundingRect = Rect(size:canvasSize)

        // Form a bounding rect around the ball (ellipse)
        let ballBoundingRect = boundingRect()

        // Perform a hit test of the ball with the canvas bounding rect.
        let hitTest = canvasBoundingRect.containment(target:ballBoundingRect)

        // If we're too far to the top or bottom, we bounce the y velocity
        if hitTest.tooFarTop || hitTest.tooFarBottom {
            velocityY = -velocityY
        }

        // If we're too far to the left or right, we bounce the x velocity
        if hitTest.tooFarLeft || hitTest.tooFarRight {
            velocityX = -velocityX
        }
    }
}
 |
Run the program and refresh the browser page. |
Game Rules[edit]
In the game of pong, the goal is to prevent the ball from coming into contact with your edge of the screen. As such, we need to alter our code to handle hits on the left and right side of the screen.
func calculate(canvasSize:Size) {
    guard let mainScene = scene as? MainScene else {
        fatalError("Ball expected owning scene to be type MainScene.")
    }

    if !coordinatesSet {
        // ...
    } else {
        // ...

        // If we're too far to the left or right, we need to reset the ball and tell the scene which player has scored
        if hitTest.tooFarLeft {
            coordinatesSet = false
            mainScene.addPoint(to:.right)
        } else if hitTest.tooFarRight {
            coordinatesSet = false
            mainScene.addPoint(to:.left)
        }
    }
}
 |
Run the program and refresh the browser page. |
Adding Paddles[edit]
Now that we have a (almost) fully functioning ball, lets add the paddles. enter emacs and navigate to the file InteractionLayer.swift. You should notice the following RenderableEntities defined at the top of the class:
let ball = Ball()
let leftPaddle = Paddle(position:.left)
let rightPaddle = Paddle(position:.right)
Although these entities are already created, they are not yet recieving frame updates. To register an entity to recieve frame updates, we use the insert(entity: at:) function. Navigate to the initialization and add the following lines:
init() {
    // Using a meaningful name can be helpful for debugging
    super.init(name:"Interaction")

    // We insert our RenderableEntities in the constructor
    insert(entity:ball, at:.front)
    insert(entity:leftPaddle, at:.front)
    insert(entity:rightPaddle, at:.front)
}
 |
Run the program and refresh the browser page. |
Note: when you run the program, use the "w" and "s" keys to maneuver the left paddle, and the "ArrowUp" and "ArrowDown" keys to maneuver the right paddle.
You may notice that the paddles aren't interacting with the ball. To correct this, change the enableHitTesting variable at the top of the file to true.
Your Turn[edit]
To take this project one step further, try implementing some of the following features:
- In the Paddle.swift file, try changing the keybindings to move the paddles up and down.
- Try changing some of the colors and styling of components to make the game your own.
- Add a short delay between rounds after the ball resets to the center of the canvas and before it resumes moving.
- Implement a power bounce such that immediately after a collision with the canvas edge the ball accelerates to twice its original velocity then slows back to that original velocity.
HTML/CSS[edit]
After you have finished learning about graphics, click here to learn how to create your own website!
CS Ed Week Home Page[edit]
Or return to the home page!


