
Difference between revisions of "W1501 Introduction to Objects"
(Vandalism - Undo revision 17533 by Darsh-radadia) Tag: Undo |
|||
| (62 intermediate revisions by 5 users not shown) | |||
| Line 1: | Line 1: | ||
= | [[File:PDP-15 Graphics terminal with tablet CHM.agr.jpg|thumb|link=|PDP-15 Graphics Terminal with Tablet]] | ||
== Prerequisites == | |||
* [[W1412 Constructors]] | |||
== Background == | |||
* Read [[Media:ComputerScienceOne.pdf|Computer Science I Textbook by Bourke]] Chapter 10. Encapsulation & Objects | * Read [[Media:ComputerScienceOne.pdf|Computer Science I Textbook by Bourke]] Chapter 10. Encapsulation & Objects | ||
= | == Introduction == | ||
=== Definitions === | |||
;Class:An ''extensible program-code-template'' for creating '''objects'''. | |||
;Extensible:Something that is able to be ''extended'' by allowing the addition of new capabilities and functionality. | |||
;Template:Something that serves as a model for duplication. | |||
;Object:An instance of a class. | |||
Classes are a useful construct to aid humans in constructing software that is sensible by enabling '''encapsulation'''. In its most basic sense, ''encapsulation'' is the action of enclosing something in or as if in a capsule. As it relates to computer science, ''encapsulation'' has a specific meaning, and refers to: | |||
* '''Bundling''' related '''data''' (nouns, something that an object ''has'') | |||
* '''Bundling''' related '''functions''' (verbs, something that an object ''does'') | |||
* '''Protecting''' data by '''controlling visibility''' (restricting undesirable access to data and functions) | |||
Let's contrast this definition with that of an array: | |||
{| class="wikitable" | |||
! Array | |||
! Object | |||
|- | |||
| '''Collection''' of similar '''elements''' || '''Group''' of dissimilar yet '''related data''' | |||
|} | |||
Consider the following table: | |||
{| class="wikitable" | |||
! First Name | |||
! Last Name | |||
! ID | |||
! GPA | |||
|- | |||
| Tom || Baker || 74 || 3.75 | |||
|- | |||
| Christopher || Eccleston || 5 || 3.5 | |||
|- | |||
| David || Tennant || 10 || 4.0 | |||
|- | |||
| Matt || Smith || 29 || 3.2 | |||
|} | |||
In this table, a ''column'' is similar to an ''array'', a collection of similar elements: | |||
{| class="wikitable" | |||
! First Name | |||
! Last Name | |||
! ID | |||
! GPA | |||
|- | |||
| Tom | |||
| Baker | |||
| style="background:red;" | 74 | |||
| 3.75 | |||
|- | |||
| Christopher | |||
| Eccleston | |||
| style="background:red;" | 5 | |||
| 3.5 | |||
|- | |||
| David | |||
| Tennant | |||
| style="background:red;" | 10 | |||
| 4.0 | |||
|- | |||
| Matt | |||
| Smith | |||
| style="background:red;" | 29 | |||
| 3.2 | |||
|} | |||
In the same table, a ''row'' is similar to an ''object'', a group of dissimilar yet related data: | |||
{| class="wikitable" | |||
! First Name | |||
! Last Name | |||
! ID | |||
! GPA | |||
|- | |||
| Tom || Baker || 74 || 3.75 | |||
|- style="background:red;" | |||
| Christopher || Eccleston || 5 || 3.5 | |||
|- | |||
| David || Tennant || 10 || 4.0 | |||
|- | |||
| Matt || Smith || 29 || 3.2 | |||
|} | |||
== | === Swift Example === | ||
Closely review the below code segment. Be sure to read each of the four numbered comments. | |||
<syntaxhighlight lang="swift"> | |||
<syntaxhighlight lang=" | // 1. The next line defines a CLASS named Student. Like all types, class names should be capitalized. | ||
class Student { | |||
let firstName : String // 2. This section defines PROPERTIES, the DATA that an object HAS. | |||
let lastName : String // | | |||
let id : Int // | | |||
let GPA : Double // | | |||
// 3. The next code segment is a CONSTRUCTOR. It is invoked automatically to initialize the object. | |||
init(firstName:String, lastName:String, id:Int) { | |||
self.firstName = firstName | |||
self.lastName = lastName | |||
self.id = id | |||
self.GPA = 4.0 | |||
} | |||
// 4. The next code segment is a METHOD. It's similar to a function but has access to the object's | |||
// properties. It's something that an object DOES. | |||
func adjustGPA(newGPA:Double) { | |||
GPA = newGPA | |||
} | |||
} | |||
</syntaxhighlight> | </syntaxhighlight> | ||
== Scenes == | |||
We'll begin our exploration of objects using {{SwiftLibrary|Scenes}}. {{SwiftLibrary|Scenes}} is an object-oriented, event-driven platform that enables us to write server-side Swift code which (rapidly) sends a series of instructions to a browser to generate visual effects, and optionally, an interactive experience. {{SwiftLibrary|Scenes}} is built upon another framework called {{SwiftLibrary|Igis}}. | |||
{{Caution| | |||
It's important to understand that while many of the objects we'll be using have an associated ''visual'' representation, the majority of the objects that we build and interact with in programming will not have such a representation. | |||
}} | |||
== Prepare == | |||
{{ScenesShellPrepare|W1501}} | |||
== Hello World == | == Hello World == | ||
Stop the running program | === Text === | ||
{{StopProgram|Stop the running program. | |||
Return to the ''console'' and press {{SpecialKey|CONTROL|C}} | |||
}} | |||
Open the file {{Pathname|Background.swift}} in emacs. Read through the file. You'll find some code as follows: | |||
<syntaxhighlight lang="swift"> | |||
class Background : RenderableEntity | |||
</syntaxhighlight> | |||
This defines a new {{SwiftKeyword|class}} named {{SwiftClass|Background}}. The colon and the following identifier, {{SwiftClass|RenderableEntity}}, indicates that the {{SwiftKeyword|class}} {{SwiftClass|Background}} inherits properties and methods from the class {{SwiftClass|RenderableEntity}}. You'll note that the {{SwiftKeyword|class}} includes a '''constructor''', indicated by the keyword {{SwiftKeyword|init}} on line 2: | |||
<syntaxhighlight lang=" | <syntaxhighlight lang="swift" line> | ||
class Background : RenderableEntity { | |||
init() { | |||
// Using a meaningful name can be helpful for debugging | |||
super.init(name:"Background") | |||
} | |||
} | |||
</syntaxhighlight> | </syntaxhighlight> | ||
The '''constructor''' is invoked automatically as the object (an '''instance''' of the class) is being initialized. This is the place where you'll set up your object. The current constructor in this file sets the object's name using the keywords {{SwiftKeyword|super}} and {{SwiftKeyword|init}}. {{SwiftKeyword|super}} indicates that we're invoking a function (or accessing a property) on our '''parent''' class, the class from which we ''inherited''. In this case, that would be the {{SwiftClass|RenderableEntity}}. | |||
<syntaxhighlight lang="swift"> | |||
We're going to display some text on our ''canvas'' (the virtual surface on which we'll be rendering images in the browser). In order to do that, we'll first declare a {{SwiftClass|Text}} object as follows: | |||
<syntaxhighlight lang="swift" highlight="2" line> | |||
class Background : RenderableEntity { | |||
let text : Text | |||
init() { | |||
// Using a meaningful name can be helpful for debugging | |||
super.init(name:"Background") | |||
} | } | ||
} | |||
</syntaxhighlight> | </syntaxhighlight> | ||
We'll ''initialize'' our text object in the constructor: | |||
<syntaxhighlight lang=" | <syntaxhighlight lang="swift" highlight="5-6" line> | ||
class Background : RenderableEntity { | |||
let text : Text | |||
init() { | |||
// Initialize objects | |||
text = Text(location:Point(x:50, y:50), text:"Hello, World!") | |||
// Using a meaningful name can be helpful for debugging | |||
super.init(name:"Background") | |||
} | |||
} | |||
</syntaxhighlight> | </syntaxhighlight> | ||
At this point, we have a {{SwiftClass|Text}} object that "knows" how to render itself on the canvas, but it hasn't yet actually done any rendering. There are two methods in which we generally render. The first is called {{SwiftIdentifier|setup}}. The {{SwiftIdentifier|setup}} function executes once. It's an opportunity to set up objects and/or render if we're creating a static (non-animated) display. The other function is {{SwiftIdentifier|render}} which executes once per frame. In this case, using {{SwiftIdentifier|setup}} is sufficient. | |||
Add a new method (below ''init'') as follows: | |||
<syntaxhighlight lang="swift"> | <syntaxhighlight lang="swift" line> | ||
func setup(canvas:Canvas) { | override func setup(canvasSize:Size, canvas:Canvas) { | ||
canvas.render(text) | |||
canvas. | |||
} | } | ||
</syntaxhighlight> | </syntaxhighlight> | ||
This code instructs the ''text'' object to render itself on the canvas. | |||
<syntaxhighlight lang=" | |||
Be sure to edit the file as indicated above, save the file, then suspend emacs. | |||
{{RunProgram|Run the program and refresh the browser page.}} | |||
{{Observe|: Section 1| | |||
# What do you observe? | |||
# How large is the text?}} | |||
=== Font === | |||
{{StopProgram|Stop the running program.}} | |||
Let's change the font. Resume emacs and add a line below where the text object is instantiated. | |||
<syntaxhighlight lang="swift" highlight="4"> | |||
init() { | |||
// Initialize objects | |||
text = Text(location:Point(x:50, y:50), text:"Hello, World!") | |||
text.font = "30pt Arial" | |||
// Using a meaningful name can be helpful for debugging | |||
super.init(name:"Background") | |||
} | |||
</syntaxhighlight> | </syntaxhighlight> | ||
{{GoingDeeper| | |||
[[File: Graphic_Coordinate_System.png|left|link=]] | |||
You should notice that the location of the text above was specified as:<br/> | |||
<syntaxhighlight lang="swift" inline>location:Point(x:50, y:50)</syntaxhighlight>.<br/> | |||
This is familiar from your studies of the Cartesian plane in grade school. However, it's important to note that for ''many'' (but not all) computer graphic platforms the y-axis is inverted, with the origin at the top-left of the screen and larger y values moving ''down'' the screen. | |||
}} | |||
Remember to save the file, then suspend emacs. | |||
{{RunProgram|Run the program and refresh the browser page.}} | |||
{{Observe|: Section 2| | |||
# What do you observe? | |||
# How large is the text now?}} | |||
=== Rectangle === | |||
{{StopProgram|Stop the running program.}} | |||
Let's add a rectangle around the text. Resume emacs and add the highlighted lines: | |||
<syntaxhighlight lang="swift" highlight="4,11-12"> | |||
class Background : RenderableEntity { | |||
let text : Text | |||
let rectangle : Rectangle | |||
init() { | |||
// Initialize objects | |||
text = Text(location:Point(x:50, y:50), text:"Hello, World!") | |||
text.font = "30pt Arial" | |||
let rect = Rect(topLeft:Point(x:20, y:10), size:Size(width:300, height:50)) | let rect = Rect(topLeft:Point(x:20, y:10), size:Size(width:300, height:50)) | ||
rectangle = Rectangle(rect:rect, fillMode:.stroke) | |||
// Using a meaningful name can be helpful for debugging | |||
super.init(name:"Background") | |||
} | } | ||
</syntaxhighlight> | </syntaxhighlight> | ||
Then, update the following, highlighted line in the {{SwiftIdentifier|setup}} function: | |||
<syntaxhighlight lang=" | <syntaxhighlight lang="swift" highlight="2"> | ||
override func setup(canvasSize:Size, canvas:Canvas) { | |||
canvas.render(text, rectangle) | |||
} | |||
</syntaxhighlight> | </syntaxhighlight> | ||
Remember to save the file, then suspend emacs. | |||
{{RunProgram|Run the program and refresh the browser page.}} | |||
{{Observe|: Section 3| | |||
# What do you observe? | |||
# What is the purpose of the location parameter in the Text constructor? | |||
# What is the corresponding parameter named in the Rectangle? | |||
# What is the difference between a Rect and a Rectangle? Hint: Are you able to render a Rect? | |||
}} | |||
{{StopProgram|Stop the running program.}} | |||
== Exercises == | == Exercises == | ||
Making use of your accumulated knowledge to date (loops, functions, coding style, etc.) and using only Rectangles and Text: | * {{Assignment|J1501}} Create a journal and answer all questions. Be sure to include all sections of the journal, properly formatted. | ||
# Draw a single rectangle (without any text) | * Making use of your accumulated knowledge to date (loops, functions, coding style, etc.) and using only Rectangles and Text on a single canvas: | ||
# Draw a grid (at least 3 x 3) | *# Draw a single rectangle (without any text) | ||
# Draw a brick wall (at least 5 x 5) | *# Draw a grid (at least 3 x 3) | ||
# Draw a pyramid constructed of bricks (at least seven rows high) | *# Draw a brick wall (at least 5 x 5) | ||
# Draw a skyscraper with a large sign on the roof containing your name | *# Draw a pyramid constructed of bricks (at least seven rows high) | ||
# Draw at least three skyscrapers of different heights on the same Canvas, each containing your name | *# Draw a skyscraper with a large sign on the roof containing your name | ||
*# Draw at least three skyscrapers of different heights on the same Canvas, each containing your name | |||
* {{MMMAssignment|M1501-28}} | |||
[[Category:IGIS]] | |||
Latest revision as of 18:03, 22 February 2022

Prerequisites[edit]
Background[edit]
- Read Computer Science I Textbook by Bourke Chapter 10. Encapsulation & Objects
Introduction[edit]
Definitions[edit]
- Class
- An extensible program-code-template for creating objects.
- Extensible
- Something that is able to be extended by allowing the addition of new capabilities and functionality.
- Template
- Something that serves as a model for duplication.
- Object
- An instance of a class.
Classes are a useful construct to aid humans in constructing software that is sensible by enabling encapsulation. In its most basic sense, encapsulation is the action of enclosing something in or as if in a capsule. As it relates to computer science, encapsulation has a specific meaning, and refers to:
- Bundling related data (nouns, something that an object has)
- Bundling related functions (verbs, something that an object does)
- Protecting data by controlling visibility (restricting undesirable access to data and functions)
Let's contrast this definition with that of an array:
| Array | Object |
|---|---|
| Collection of similar elements | Group of dissimilar yet related data |
Consider the following table:
| First Name | Last Name | ID | GPA |
|---|---|---|---|
| Tom | Baker | 74 | 3.75 |
| Christopher | Eccleston | 5 | 3.5 |
| David | Tennant | 10 | 4.0 |
| Matt | Smith | 29 | 3.2 |
In this table, a column is similar to an array, a collection of similar elements:
| First Name | Last Name | ID | GPA |
|---|---|---|---|
| Tom | Baker | 74 | 3.75 |
| Christopher | Eccleston | 5 | 3.5 |
| David | Tennant | 10 | 4.0 |
| Matt | Smith | 29 | 3.2 |
In the same table, a row is similar to an object, a group of dissimilar yet related data:
| First Name | Last Name | ID | GPA |
|---|---|---|---|
| Tom | Baker | 74 | 3.75 |
| Christopher | Eccleston | 5 | 3.5 |
| David | Tennant | 10 | 4.0 |
| Matt | Smith | 29 | 3.2 |
Swift Example[edit]
Closely review the below code segment. Be sure to read each of the four numbered comments.
// 1. The next line defines a CLASS named Student.  Like all types, class names should be capitalized.
class Student {
    let firstName : String    // 2.  This section defines PROPERTIES, the DATA that an object HAS.
    let lastName : String     // |
    let id : Int              // |
    let GPA : Double          // |

    // 3. The next code segment is a CONSTRUCTOR.  It is invoked automatically to initialize the object.
    init(firstName:String, lastName:String, id:Int) {
        self.firstName = firstName
        self.lastName = lastName
        self.id = id
        self.GPA = 4.0
    }

    // 4. The next code segment is a METHOD.  It's similar to a function but has access to the object's
    //    properties.  It's something that an object DOES.
    func adjustGPA(newGPA:Double) {
        GPA = newGPA
    }
}
Scenes[edit]
We'll begin our exploration of objects using Scenes. Scenes is an object-oriented, event-driven platform that enables us to write server-side Swift code which (rapidly) sends a series of instructions to a browser to generate visual effects, and optionally, an interactive experience. Scenes is built upon another framework called Igis.

It's important to understand that while many of the objects we'll be using have an associated visual representation, the majority of the objects that we build and interact with in programming will not have such a representation.
Prepare[edit]
Create a new Scenes shell project within your Experiences directory:
ty-cam@codermerlin:~$ cd ~/Experiences
ty-cam@codermerlin:~/Experiences$ git clone https://github.com/TheCoderMerlin/ScenesShellBasic W1501
Enter the Sources/ScenesShell directory of the new project:
ty-cam@codermerlin:~/Experiences$ cd W1501/Sources/ScenesShell/
| Run the program.
ty-cam@codermerlin:~/Experiences/W1501/Sources/ScenesShell$ run |
Ensure that you are logged on to the wiki. Then, click on the Tools menu followed by right-clicking on IGIS and selecting the menu item Open in New Window or Open in New Tab.
You'll know you're successful if you see the title bar change to "Coder Merlin: IGIS". (The browser window will be blank because we haven't added any graphics yet.)
 Helpful Hint
Hello World[edit]
Text[edit]
| Stop the running program.
Return to the console and press CONTROL-C |
Open the file Background.swift in emacs. Read through the file. You'll find some code as follows:
class Background : RenderableEntity
This defines a new class named Background. The colon and the following identifier, RenderableEntity, indicates that the class Background inherits properties and methods from the class RenderableEntity. You'll note that the class includes a constructor, indicated by the keyword init on line 2:
class Background : RenderableEntity {
    init() {
        // Using a meaningful name can be helpful for debugging
        super.init(name:"Background")
    }
}
The constructor is invoked automatically as the object (an instance of the class) is being initialized. This is the place where you'll set up your object. The current constructor in this file sets the object's name using the keywords super and init. super indicates that we're invoking a function (or accessing a property) on our parent class, the class from which we inherited. In this case, that would be the RenderableEntity.
We're going to display some text on our canvas (the virtual surface on which we'll be rendering images in the browser). In order to do that, we'll first declare a Text object as follows:
class Background : RenderableEntity {
    let text : Text

    init() {
        // Using a meaningful name can be helpful for debugging
        super.init(name:"Background")
    }
}
We'll initialize our text object in the constructor:
class Background : RenderableEntity {
    let text : Text

    init() {
        // Initialize objects
        text = Text(location:Point(x:50, y:50), text:"Hello, World!")

        // Using a meaningful name can be helpful for debugging
        super.init(name:"Background")
    }
}
At this point, we have a Text object that "knows" how to render itself on the canvas, but it hasn't yet actually done any rendering. There are two methods in which we generally render. The first is called setup. The setup function executes once. It's an opportunity to set up objects and/or render if we're creating a static (non-animated) display. The other function is render which executes once per frame. In this case, using setup is sufficient.
Add a new method (below init) as follows:
    override func setup(canvasSize:Size, canvas:Canvas) {
        canvas.render(text)
    }
This code instructs the text object to render itself on the canvas.
Be sure to edit the file as indicated above, save the file, then suspend emacs.
| Run the program and refresh the browser page. |

- What do you observe?
- How large is the text?
Font[edit]
| Stop the running program. |
Let's change the font. Resume emacs and add a line below where the text object is instantiated.
    init() {
        // Initialize objects
        text = Text(location:Point(x:50, y:50), text:"Hello, World!")
        text.font = "30pt Arial"

        // Using a meaningful name can be helpful for debugging
        super.init(name:"Background")
    }

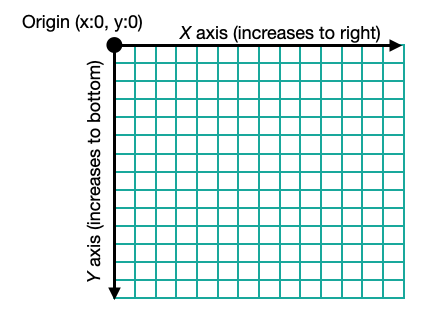
You should notice that the location of the text above was specified as:
location:Point(x:50, y:50).
This is familiar from your studies of the Cartesian plane in grade school. However, it's important to note that for many (but not all) computer graphic platforms the y-axis is inverted, with the origin at the top-left of the screen and larger y values moving down the screen.
Remember to save the file, then suspend emacs.
| Run the program and refresh the browser page. |
- What do you observe?
- How large is the text now?
Rectangle[edit]
| Stop the running program. |
Let's add a rectangle around the text. Resume emacs and add the highlighted lines:
class Background : RenderableEntity {

    let text : Text
    let rectangle : Rectangle

    init() {
        // Initialize objects
        text = Text(location:Point(x:50, y:50), text:"Hello, World!")
        text.font = "30pt Arial"

        let rect = Rect(topLeft:Point(x:20, y:10), size:Size(width:300, height:50))
        rectangle = Rectangle(rect:rect, fillMode:.stroke)

        // Using a meaningful name can be helpful for debugging
        super.init(name:"Background")
    }
Then, update the following, highlighted line in the setup function:
    override func setup(canvasSize:Size, canvas:Canvas) {
        canvas.render(text, rectangle)
    }
Remember to save the file, then suspend emacs.
| Run the program and refresh the browser page. |
- What do you observe?
- What is the purpose of the location parameter in the Text constructor?
- What is the corresponding parameter named in the Rectangle?
- What is the difference between a Rect and a Rectangle? Hint: Are you able to render a Rect?
| Stop the running program. |
Exercises[edit]
- J1501 Create a journal and answer all questions. Be sure to include all sections of the journal, properly formatted.
- Making use of your accumulated knowledge to date (loops, functions, coding style, etc.) and using only Rectangles and Text on a single canvas:
- Draw a single rectangle (without any text)
- Draw a grid (at least 3 x 3)
- Draw a brick wall (at least 5 x 5)
- Draw a pyramid constructed of bricks (at least seven rows high)
- Draw a skyscraper with a large sign on the roof containing your name
- Draw at least three skyscrapers of different heights on the same Canvas, each containing your name
- M1501-28 Complete Merlin Mission Manager Mission M1501-28.