
Difference between revisions of "GitHub"
| Line 84: | Line 84: | ||
== Workflow Overview == | == Workflow Overview == | ||
{{ResponsiveImage| | |||
[[File:Git-Workflow-Basic.png|link=]] | |||
}} | |||
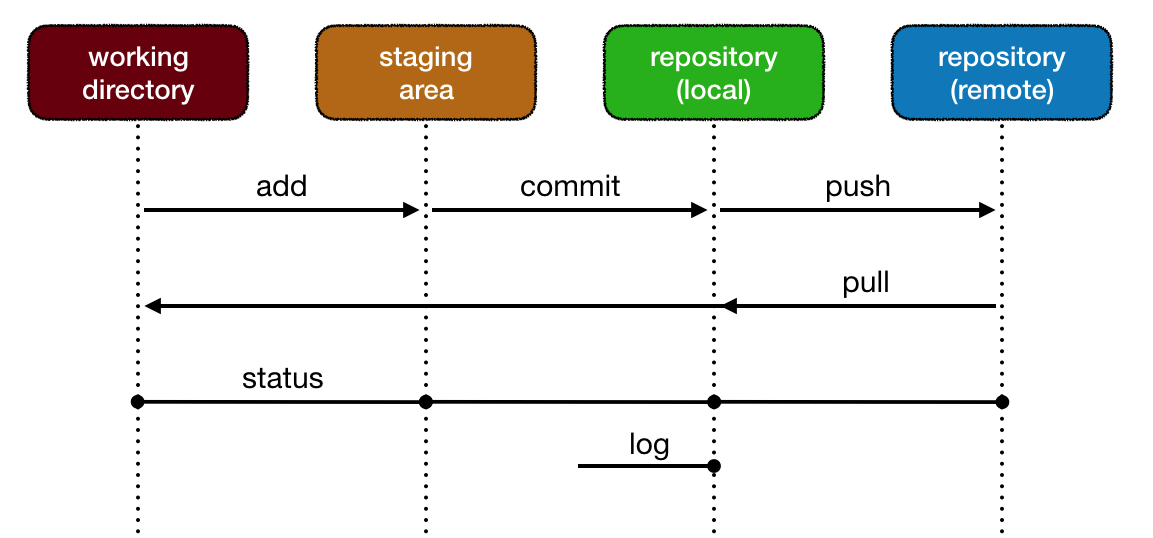
The workflow when using a remote repository is very similar to that using only a local repository, with the exception of '''push''' and '''pull'''. | |||
# <code>add</code> the files to the staging area | |||
# <code>commit</code> the files to the repository | |||
# <code>push</code> the local repository to the remote | |||
The most significant difference is that we'll need to keep in mind that others may also be working on the remote repository, so we'll need to sync their remote changes with our local repository. The best practice is to perform a <code>pull</code> ''prior'' to beginning work in the working directory. | |||
== Key Concepts == | == Key Concepts == | ||
Revision as of 13:16, 16 July 2019
Prerequisites[edit]
Introduction[edit]
While using git locally is a wonderful way to track our revisions and enable us to rollback to previous versions, in order to take full advantage of git we'll use GitHub. GitHub is a service where we can replicate (copy) our repository and collaborate with others.
A GitHub Account[edit]
Your guide will set up a repository for your use for this assignment. Be sure to follow the instructions carefully. In order to participate, you'll need a GitHub account. GitHub accounts are free to create.
- Go to https://github.com
- Click on the
 button at the top, right-hand side of the page
 - On the next page ("Set up your account") there will be a short form:
- Create a unique (and appropriate) username
- Provide an accessible email address, as directed by your guide
- Provide a password
- You may receive a small puzzle to solve; if so, solve the puzzle
- Click on the
 button
- On the next page ("Choose your subscription") is another short form:
- Select the
 option
 - Scroll to the bottom
- Do NOT select "Help me set up an organization next"
- You MAY select "Send me updates..."; it's up to you
- Click the
 button
- Select the
- You may safely skip the next step
- You'll receive an email to the address you specified.
- Check your email client and find the email from GitHub
- Click the
 button
Configuration[edit]
In order to use these commands with a remote repository, it's best to cache your credentials. On the command line, execute:
jane-williams@codermerlin:~$ git config --global credential.helper 'store --file ~/.git-credentials'
jane-williams@codermerlin:~$ git config --global credential.useHttpPath true
In order to squelch the warning that occurs while pushing, execute:
jane-williams@codermerlin:~$ git config --global push.default matching
Assignments[edit]
Your guide will create a GitHub assignment for you. You'll receive an email with an invitation link.
- Sign in to GitHub using the correct account BEFORE clicking on the link
- Click on the link
 Helpful Hint
Your guide will create assignments for you which are "Private"; they'll only be visible to you (or your group for group assignments) and your guide. If you create any repositories on your own, be sure you select the correct setting.
Joining the Classroom Roster[edit]
The first time that you click on an assignment you'll be asked to join the classroom roster. You'll see a message similar to: "Join the classroom roster: Your teacher has configured this classroom to pair GitHub accounts with identifiers."
- Click on your identifier. (Do NOT skip this step.)
- The next page will present you with an
 . Click the button.
 - You'll may see a progress bar (or two). Be patient as your assignment is prepared. When the assignment is ready, you'll see the message: "You are ready to go!"
- They'll be a link at the very bottom of the page, immediately after the text "Your assignment has been created here:" Click on that link. You'll need this link in a subsequent step in this experience.
Helpful Hint
First GitHub Assignment[edit]
Your first GitHub assignment will be to sync all of your journals with GitHub. In order to do so, you'll need to specify a GitHub URL as your "remote" for your existing git repository.
Enter your Journals directory:
john-williams@codermerlin:~$ cd ~/Journals
Remember that you've already added all of these files to your local git repository. You can easily verify this by checking the status.
john-williams@codermerlin:~$ git status
You should see something similar to:
On branch master
nothing to commit, working tree clean
Let's add the remote. To do so, we'll need the URL from the above assignment. It will be something similar to:
https://github.com/.../2024-journals-JohnWilliams
Be sure to use your own url, which will be unique to you.
john-williams@codermerlin:~/Journals$ git remote add origin https://github.com/.../2020-journals-JohnWilliams.git
Then, we can push our local commits to the remote server:
john-williams@codermerlin:~/Journals$ git push -u origin master
You'll then be promoted to enter your username and password. Remember to use your GitHub username and password.
Workflow Overview[edit]
The workflow when using a remote repository is very similar to that using only a local repository, with the exception of push and pull.
addthe files to the staging areacommitthe files to the repositorypushthe local repository to the remote
The most significant difference is that we'll need to keep in mind that others may also be working on the remote repository, so we'll need to sync their remote changes with our local repository. The best practice is to perform a pull prior to beginning work in the working directory.